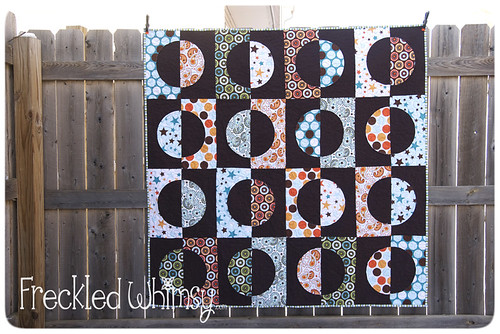
The reason I haven't shown you any new quilts recently is that I'm deep into the process of making the quilts for my new patterns! I can't wait to show them to you... trust me keeping secrets isn't fun! All I can say is that I have a lot in the works and I'm so excited about all the new developments over here! Most of the quilts are off at the quilter now & I should be able to show them to you soon!
In the meantime I thought I'd tell you a bit about my pattern development process. I'm sure every designer has a different process but here is a peek inside mine. Below are some photos & info that show you my process for developing Opposites Attract.
It usually starts with a sketch. Sometimes it's in a nice notebook...sometimes it's on a random napkin. Inspiration strikes at all times. After I have a general idea of what I want to make I head to the computer. Between EQ, Photoshop, and Illustrator I come up with a few visuals. Sometimes it's at this point that I decide a design isn't working at all. With Opposites Attract I was pretty happy with what I was seeing and needed to decide on color.
I really wanted to work with a bright & fun color for the background. I auditioned the green and tried to make it work but I kept going back to the high contrast with the brown and navy.
In the end I decided brown was best. I could have used a basic solid but I really love the texture of
Kona Crush so I went with Chocolate Kona Crush. The process of making these blocks is easy and I had a quilt top put together in no time. Also it was around this time that I decided I wanted a large block and after a few test runs decided on a 14" finished block.
The next decision is binding. Many people don't give the binding much thought... but I'm not one of them! I wanted something that would coordinate with the prints and pop off of the brown. I decided on a stripe from Remix cut on the bias for double fold
bias binding.
During the process I'm actually making the quilt from the first draft of my pattern. I add notes and make any changes that are needed. Those who know me well know that I LOVE the math part of quilting. I know many people can't stand that part but I'm just a numbers girl. I really enjoy calculating the fabric requirements, all of the measurements and so on. Once the pattern is close to 100% I send it off to my testers while I work on the cover art. Finding testers wasn't so easy for me at first. I used to be a pattern tester & technical editor myself so I have really high standards. In the end I found a rocking group of people and I love them!! (Sending lots of hugs and thank yous to you all!)
The initial photos confirmed that I made the perfect decision with my binding choice.
I knew I wanted the cover photo to be after washing the quilt, but just in case something happened I took a ton of photos before washing it.
This is one of my favorite photos... even if it doesn't show much of the quilt.
Sometimes photo shoots can drain you and you need to take a break!
Along with the stylized shots I took a flat shot for the inside of the pattern.
Details
Pattern - Opposites Attract
Designed by me
Quilted by me
Started on 8/29/10
Finished on 9/11/10
Quilt measures - 56" x 56"
I needed to take a few more process photos for the inside of the pattern and decided I'd make a second quilt from
Suburbia by Caleb Gray. I went back to the computer to decide on a background color and ended up deciding on brown again.
Instead of Crush I decided to use
Quilter's Linen. I couldn't find a stripe I liked for binding so I was trying to decide between two colors of more Quilter's Linen... Leaf and Natural. I snapped this photo and sent it to my testers for their opinions. It was unanimous that Leaf was the right choice.
Here is the finished second quilt.
Details
Pattern - Opposites Attract
Designed by me
Quilted by me
Started on 10/12/10
Finished on 10/27/10
Quilt measures - 56" x 56"
Last minute touches to the pattern directions and back cover and it was time to send it to the printer. I included lots of information on the back cover so that you make this quilt in 4 sizes and see all of the fabric requirements while you're in a quilt shop picking out fabric.
It wasn't long before the patterns were back from the printer! I print my patterns in full color and they are stapled so that you don't loose any directions. I personally own well over 100 patterns and I learned a lot about patterns in my time working at a shop. Sometimes pattern covers are cute and then the directions are horrible or the printing looks like it's been photocopied a few times and taped together. I set a goal for myself early on that my patterns would be well tested and printed in a way that was deserving of being purchased.
I show step by step through text and photos how to make the block including a few tips. In case you don't want to buy the ruler I also included a paper template inside the pattern.
I'm really proud of my patterns and hope you enjoy them!
Want to get your own copy? Ask your local shop or check out these shops where you can buy a copy online.
Wholesale Information
Are you a shop interested in carrying my patterns?
One of my favorite things is seeing people make quilts from my patterns!
Karrie Lyne made her opposites attract using fabric from Riley Blake. Instead of keeping the colors together she went scrappy and I love the way it turned out!
Have you made opposites attract? If so I'd love to see a photo or you can upload it to the
flickr group!
I hope you enjoyed this peek into my process! :-)

© Blog post written by Julie Herman
For more information visit http://www.jaybirdquilts.com/


