The number one question I get asked when people learn I'm a quilter, is "how long does it take to make a quilt?" Of course there isn't one answer to this question. I often guess and throw out a number, but I realized that I didn't really know how long it took.
Many factors will influence how long it takes to make a quilt. Size, materials, difficultly level, as well as the experience of the quilt maker are just a few factors.
Prior to this project I had little information on how long I spend on a project.
One time I pieced a quilt for another designer as a “stunt quilting” job and I had to keep track of how much time I spent on the project. I logged all my time spent over the course of three days. In total I spend 8 hrs and 10 minutes cutting and piecing the entire quilt top and then I sent it off to the quilter. It was the first time I had tracked all of the time spent on one specific project. {from my interview here}
I told myself that one day I'd track the time spent on a quilt from start to finish. The circumstances around this project provided me with the opportunity to do so.
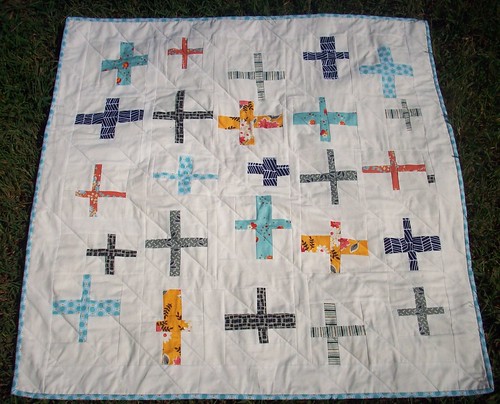
Below is a timeline for you with timestamped photos, tweets, and notes I jotted along the way. I cut, pieced, quilted & bound this one quilt in 17.25 hours during a 23.5 hour time period. I know it seems crazy, but below I explain the how and the why.
details
pattern - City Green from City Quilts
quilted by me
started on 9/23/2010
finished on 9/24/2010
quilt measures - 50" x 55"
HOW
I started cutting the fabric for this quilt at 3PM on 9/23/10. Initially I had not planned on tracking the time for this quilt or posting a timeline. As a result the first photo I took wasn't until 3:57 PM from my phone. I posted the photo to twitter.
Just keep sewing... sewing... sewing... 3:57 PM Sep 23rd via Twitter for Android
The first photo from my camera was at 5:02 PM. I had just finished sewing all the strips together.
By 5:35 PM all the strip sets were all pressed.
Then came the process of sub-cutting the strips.
I started the design wall with a 10 x 10 layout.
It quickly grew and by 6:45 PM it was 15 x 15. I decided it was a perfect time to take a dinner break and went out to the diner.
By 8:30 PM I was back home with a fresh set of eyes and working on the layout again. The design wall is an asset during this step. Eventually at 8:58 PM I decided on a layout of 18 x 20.
The next hour + was spent sewing the units into rows.
Still sewing... rows done... adding sashing... i'm thinking i'll pull an all nighter and have the quilt done by morning.12:26 AM Sep 24th via Twitter for Android
Despite my twitter announcement an hour prior, by 2:30 I had hit a wall. Part of me wanted to keep going but another part of me was afraid a sewing injury would occur. The rational part of me won and I snapped the last photo at 2:26 with about half of the top together.
In addition I also snapped a photo of myself in the mirror. I look wide awake right?...
I decided to go to bed and set my alarm for 5 AM. I hit the snooze button a few times and got up shortly after. By 5:30 AM I was back to work.
Most of the early morning was spent sewing & pressing. When a seam would flip like in the photo above, I'd take a few stitches out and fix it. Also I initially was pressing towards the long sashing strips because of the bulk of the seams. In the end I decided to press away from the sashing strips and while it was hard with the bulk, it looked much better from the front.
The top was in four pieces by 7:17 AM and was starting to look like a quilt.
At 8:01 AM most of the top was together.
I did a little happy dance when I added the borders and finished the quilt top.
The next step was to cut the batting to size and piece the backing. I piece my label into my backing for two reasons. First I like the look of a pieced backing. Second is because the quilting will go through the label and make it almost impossible to be removed.
Here is a photo of the finished quilt showing the quilting through the label.
I posted another tweet since a few people were keeping track of my progress.
The basting step came together pretty quickly.
I like to use bent safety pins when basting. They are available at most local quilt shops.
This quilt begged me to do straight line quilting. I used white thread through the middle of each sashing and also used white thread in my bobbin.
As you can see from this finished photo the white bobbin thread creates a grid on the back of the quilt.
I could see the finish line by this point and got the quilting done in just over an hour.
It also seemed like a good time to again update my twitter followers on my progress.
Quilting finished... all that is left is binding & i'll be done!
10:22 AM Sep 24th via Twitter for Android
Shortly after I tweeted the above photo Cherri House sent this tweet to me & gave me a good laugh.
@jaybirdquilts what??? I need more, I need to see the whole thing!!!!!!!!!!
10:51 AM Sep 24th via web in reply to jaybirdquilts
After the quilting was complete I trimmed off the excess batting and backing.
Then I cut strips for binding and attached them to the quilt.
I attached a few binding clips to bring the binding over to the back for hand stitching. I snapped a photo at 10:45AM and then was forced to take a break and take care of some "work." A quick trip to the post office & some errands followed.
About an hour later I was back home and back to work.
I stitched away for almost 23 minutes before I had to take another "work" break.
By 1:05PM I was again working on the binding.
Over an hour later I finished my last stitch and snapped this photo before I even cut my thread!
Items not included in the 17.25 hours.
-Initial Planning
-Shopping
-Photographing
-Washing
-Blogging
After all was said and done I washed the quilt. I love the look and feel of washed quilts.
WHY
I'm sure many people are wondering why I put this quilt together so fast and skipped out on so much sleep to do so. Some people have guessed that it was because I had a post on the
Swatch & Stitch on Friday the 24th. While I did decide it was going to be the content of my S&S post, that was not the number one reason for making the quilt.
This quilt was made for a very special woman. A woman who is unfortunately losing her battle with leukemia. All week I wanted to make her a quilt but couldn't come up with a plan. On Thursday morning I had a sudden light bulb moment and it all came to me. I worked hard to finish my work early for the day so that I could get started on the quilt. A quick trip to the fabric store to add 6 yards of purple fabric and I had everything I needed. From the moment I started the quilt I thought of her all along the way. Each time I got tired or wanted to take a break I thought of her. The few hours of sleep I got rejuvenated me and gave me all the momentum I needed to finish it.
There was a few moments where I thought I was too late. The quilt didn't make it to her on Friday and I kept it with me all day. Saturday
Tricia came over to spend the day sewing with me and trying to distract me from thinking about everything. We had a change of plans shortly after she arrived, and as any good friend would she drove me to the hospital to deliver the quilt.
Times like this put life into perspective. I've made a pledge to myself to try and spend more time quilting for fun instead of just for work. Life is too short and I want to spend it doing and making things for the people I love.
Update - 9/28/10 4:30PM
Thank you to all of you for the comments & support on this post. My friend's mother passed away peacefully last night.
How long does it take to make a quilt?
17 hours, 15 minutes & a whole lot of love.