
Binding Tutorial Posts
| ||
Basics Post #2 - Bias Binding
| ||
Basics Post #3 - Scrappy Bias Binding
| ||
Single Fold Binding (for mini quilts & small projects)
| ||
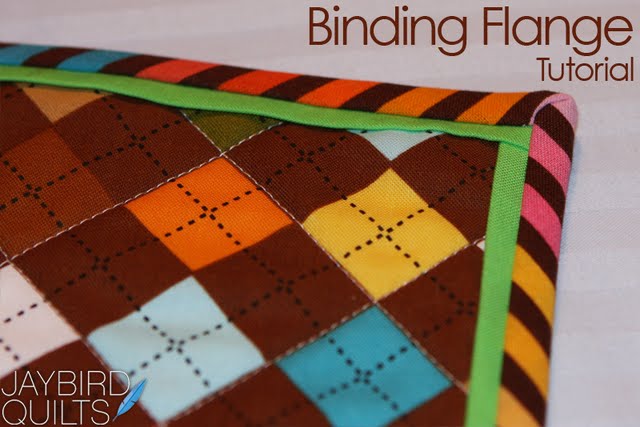
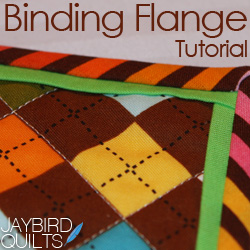
A few weeks ago I when I showed my Stash Stack Quilt I showed the binding with a flange. I got a few questions from people asking how to do it and decided it was best to take photos for a tutorial and share the info with everyone.

1. To demonstrate I put a flange on a mini quilt. Quilt your quilt as usual. Trim off the excess backing and batting.

2. After trimming off the excess batting and backing I suggest basting around the edge of the quilt with a scant 1/8" seam. This is especially helpful if the quilting is not dense around the edges. (I actually do this on all my quilts, not just those with this type of binding.)

3. I use a longer stitch for this basting step as well as for basting the flange onto the quilt top as described below in step #9.

4. This is the result of basting around the edges of the quilt.

5. Cut fabric for your flange. I cut mine at 1" wide. Subcut strips to be the length and width of your quilt top. If your sides are more than 40" piece strips together to get desired length.
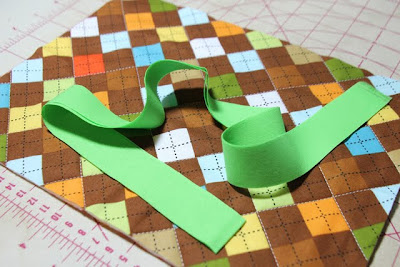
6. Fold the flange fabric in half along the length and press with the wrong sides together.

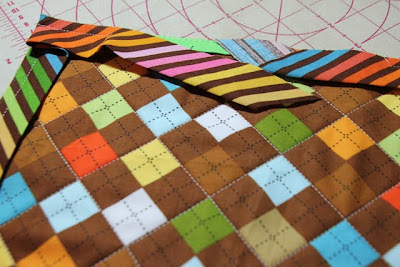
7. Pin the flange fabric to the quilt top matching the raw edges. This will feel very similar to how you attach the binding.

8. Pin all four sides in place. One side will overlap another at each corner. You can choose to have the top and bottom overlap the sides or vice versa.
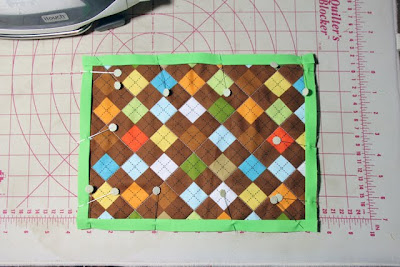
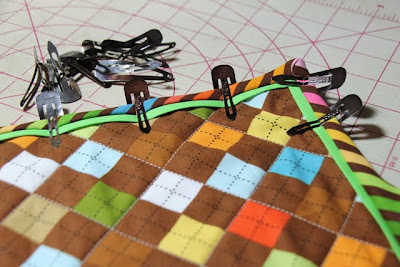
9. Baste the flange in place with a large stitch length and a scant 1/8" seam. Remove the pins as you go.

10. This will be the result.

11. Attach your binding as usual. Basic Binding directions are available on my first binding tutorial page.
12. Pin binding in place to the back of the quilt as you usually would using binding clips. Hand sew binding in place to the back of the quilt to finish.
... the result!
Binding Flanges are great for when you need a tiny bit of pop from a color before your binding. They also work great when you need contrast between a combination of a busy border and busy binding as shown here.
I hope you enjoy this tutorial!
--
want to link to this tutorial?
grab a button!
{144 x 144}

{250x250}
enjoy!!

© 2010-2022 Julie R. Herman. All rights reserved.
No part of this tutorial may be reproduced without written consent of Jaybird Quilts.
25 comments:
I love this binding - adding a little extra bit of color - great idea and thanks for the how-to!
Super cute. Thanks Julie!!
Julie, you come up with the best ideas!!! You really do!!! Thanks so much. I can think of so many fun applications for this!!!
Pretty colors! Love that technique...
Cool - thanks for the tutorial
Yeah! Thanks for sharing! I can't wait to try this technique.
Very cool! thanks for sharing this!
I am ashamed to say I never have heard of a binding flange, but I am excited to use one in one of my next quilts.
fabulous tutorial, thank you!
Your instructions are pretty easy to follow! Do you attach the binding to the same side as the flange, and then fold over to the back, or the opposite side? From the pics I can't exactly tell.
I did a flange border on this quilt. You can just see the tiny pink border going around between the green and black. The quilter basted it down during quilting so it wouldn't accidentally get turned over and stitched down.
Anyway. Longest comment ever.
brillant.
:D
I love love love this and can't wait to try it! Thanks for the tutorial Julie!
I love this idea Julie,thank you!!!
Thanks. this is so right when you want to get some little bit of contrast before the actual binding goes on.
Awesome! There have been a couple of times that I needed a break between my quilt and binding - but I have a huge aversion to attaching boarders. This looks like the perfect solution.
Well done tutorial Julie. And the green is a perfect transition on the mini quilt.
Thanks Julie!
Thank you so much for this tutorial, Julie! I will use this technique soon.
cool! Can't wait to use your idea!
Holy crap, this is the coolest thing everrrrrrrr! God Bless MBS Progressive Dinner for bringing you to me!
thank you for this inspiring tutorial! I tried this out and I love it. But I think I did the flange to big. Next time I will make a thinner flange:
http://www.flickr.com/photos/suleon/5412924536/
Best wishes
Susanne
PS also used you bias binding tutorial for my first bias binding. Also worked great!
Thank you! I had a quilt that I should have added a border to - this gave just a nice pop before the binding. Thanks for sharing this great tutorial.
Oh I love this so much! I ts just so easy and you have illustrated it very clearly... I was scared of even trying it when I had seen it before...
Cheers from India
Shruti
Thanks for the tute. I've always had a problem with the binding clips distorting my edges. I picked up some of the new ones from Clover and love them. They grip the quilt but lie flat. http://www.clover-usa.com/product/0/3155/_/Wonder_Clips_%2810_pieces%29
I have made a flange binding before, but I sewed the flange to the top of the binding and then sewed in between the binding and the flange to finish the quilt quickly with a sewing machine. It worked great...
Post a Comment